MCP and Mobile Proxies: A Step-by-Step Guide to Connecting Proxies to AI Tools
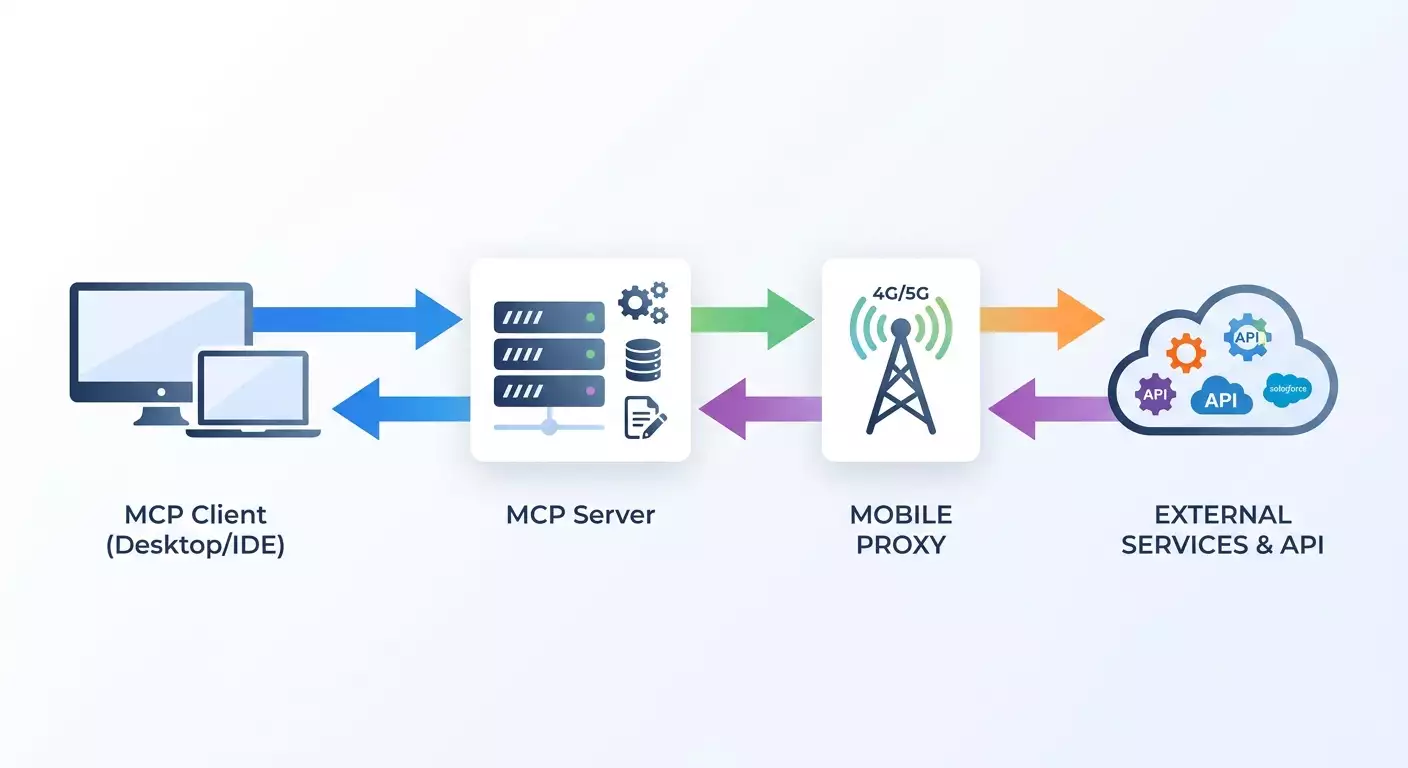
Table of contents
- Introduction
- Preparation
- What is mcp (model context protocol)
- Why ai tools need mobile proxies
- Step 1: plan your strategy and get access to mobile proxy
- Step 2: install mcp client and prepare the environment
- Connecting mobile proxy to mcp client
- Example based on mcp server mobileproxy.space
- Step 4: fine-tuning for client and server
- Step 5: diagnosis and logging
- Results verification
- Common errors
- Additional capabilities
- Faq
- Conclusion
Introduction
In this practical guide, you'll set up a mobile proxy connection to the MCP client step by step, ensuring that your AI tools can reliably and predictably work with external data sources and APIs. We'll start with a brief explanation of why mobile proxies are needed and how MCP (Model Context Protocol) operates. Then, we’ll prepare the environment, connect the proxy, go through a real example based on the MCP server mobileproxy.space, perform checks, discuss common errors, and finish with advanced options. By the end, you’ll have a functional configuration that you can transfer to your team or production environment.
This guide is aimed at developers, data analysts, and integration engineers who want to achieve reproducible network behavior for AI tools and reduce instability when accessing external websites and APIs. Even if you're new to MCP, you'll be able to follow all the steps. Advanced users will find ready-made code examples and optimization tips.
Before starting, it's helpful to understand the basics: how to open the terminal, install Node.js, edit a JSON configuration file, and read logs. Deep network knowledge is not required; we'll explain everything you need along the way.
Time required: 60 to 90 minutes, depending on whether your tools are already installed and whether you have ready mobile proxy credentials. If this is your first time setting up the MCP client, allocate about 90 minutes to carefully go through all checks and diagnostics.
Tip: If you’re implementing this configuration in a team environment, agree in advance on a unified location for storing configurations and secrets to avoid scattering proxy passwords across personal developer files.
Check: By the end of the "Checking Results" section, you'll receive a checklist to ensure the proxy is indeed in use and that tools can successfully access the internet via the mobile network.
Preparation
To ensure a smooth and quick setup, gather all tools and accesses in advance. This will save you time and help avoid mistakes mid-process.
Required Tools, Programs, and Accesses
- Operating System: Windows 10/11, macOS 12+, or Linux with installation privileges.
- Node.js LTS 20+ (along with npm) to run MCP servers in JavaScript/TypeScript.
- Code Editor: VS Code, JetBrains, or any other of your choice.
- Mobile Proxy Credentials: host, port, username, password. Ideally — also the IP rotation URL and "sticky" session parameters.
- MCP Client: such as Claude Desktop or Cline (VS Code extension) that supports connecting to external MCP servers.
- Basic network diagnostic utilities: curl or similar to check internet access through the proxy.
System Requirements
- A stable internet connection on your working machine.
- Open outgoing access to the mobile proxy ports (often 3128, 8000, 8080, or another specified by the provider).
- Disk space: at least 200 MB for Node.js packages and logs.
What to Download, Install, and Configure
- Install Node.js LTS 20+ from the official distribution for your operating system.
- Create a project working folder, for example, mcp-mobileproxy, where code and configurations will be stored.
- Check that your MCP client is installed: launch Claude Desktop or open VS Code with Cline installed.
- Gather your mobile proxy credentials (host, port, user, password), as well as the URL or command for IP rotation and parameters for "sticky" sessions if it's provided by your plan.
Backing Up
If you're editing the MCP client configuration (for example, the JSON file), make a backup of the original file before making changes. Copy it with the suffix .bak added. If something goes wrong, you can quickly revert to the original settings.
Attention: Never store proxy passwords in public repositories. For team work, use secret management tools or environment variables to prevent credential leaks.
Check: Ensure Node.js is installed (node -v outputs the version) and that you know where your MCP client’s configuration file is located. Your mobile proxy credentials are handy, and your internet access is stable.
What is MCP (Model Context Protocol)
MCP is an open protocol that standardizes how AI clients (such as desktop applications and IDE plugins) interact with external capabilities provided by MCP servers. The idea is simple: the client presents "tools" and "resources" in the interface, while the server implements their logic. This allows the same server to be connected to different clients, making tools look and function consistently across them.
Key Concepts Explained Simply
- MCP Client — an application where you interact with the model and select which tools are available to it. Examples: Claude Desktop, Cline.
- MCP Server — third-party software that implements "tools", "resources", and "prompts". The server provides descriptions of capabilities and processes requests from the client.
- Tools — actions that the model can perform: requests to web APIs, reading files, parsing HTML, making HTTP requests through a proxy, etc.
- Transport — the means of communication between the client and the server (usually stdio or web connection). This is transparent to you: you specify the server launch command and parameters.
How It Works
The client starts a session with the MCP server and receives a declarative description of capabilities: which tools are available, what parameters they take, and what they return. When you request an action from the model, the client calls the appropriate tool on the server. The server does all the "dirty" work — accessing the internet, querying databases, parsing files — and returns the result to the client. In this scenario, it's important that the server's network exits go through the mobile proxy instead of directly. This way, all AI tools requests will be routed predictably: stable IPs, rotations, "sticky" sessions, regionality, and so on.
What to Understand Before You Start
- Where exactly you'll enable the proxy: globally through environment variables or locally in the MCP server code. Both options are valid, but each has its own advantages.
- How you will confirm that the request is actually going through the proxy: for example, by checking your external IP, logs from the proxy provider, or markers in the headers.
- What IP rotation strategy you need: manual rotation button, automatic after N requests, or "sticky" sessions for the duration of the task.
Tip: Think carefully about your rotation strategy before you start. Frequent rotations are not always beneficial: many sites prefer a stable "sticky" session for a single data gathering task or API test.
Check: You understand that MCP is a "bridge" between the client and external tools, and the mobile proxy is a controlled route for these tools’ network calls. The goal is to ensure that all network steps go through the designated proxy provider.
Why AI Tools Need Mobile Proxies
Mobile proxies provide important advantages when AI tools work with external resources and APIs:
- Access Stability: some services are sensitive to the type of IP and activity from it. Mobile IPs often have different filtering heuristics, which increases predictability.
- Flexible Rotation: you can rotate IPs on demand, based on time or number of requests, avoiding accumulation of "noise" and unnecessary bans on a single address.
- Sessions: "sticky" sessions allow maintaining the same IP for the duration of an agent's task (for example, 10-30 minutes) to prevent breaking the stream of interaction.
- Region Specificity: selecting the geography of the connection, if provided by the plan, helps test the behavior of services for different countries.
In the context of MCP, this means that any tool implemented on the server side will use exactly the network route you have set, ensuring reproducibility and reducing chaos during debugging.
Warning: Use mobile proxies strictly in accordance with laws and the rules of target services. The proxy setup in this guide is designed to ensure the stability and reproducibility of AI tools, not to bypass restrictions.
Tip: If your case involves integrating an agent with multiple sources, separate them by sessions: some tools on "sticky" sessions, others on rapidly rotating IPs. This reduces overlaps and artifacts.
Check: Articulate your scenario: why do you need a mobile proxy (stability, sessions, regionality), and how will you measure success (fewer connection errors, stable IP in logs, no unexpected blocks).
Step 1: Plan Your Strategy and Get Access to Mobile Proxy
Goal of This Step
Define the parameters for using the mobile proxy (session type, rotation, regionality) and obtain working credentials for later integration with the MCP client and server.
Step-by-Step Instructions
- Decide if you will have a "sticky" session. If the agent needs to maintain context throughout the entire task, opt for the "sticky" mode for 10-30 minutes.
- Choose your rotation strategy: manual via button/URL, by schedule, or by number of requests. For starters, manual rotation will suffice.
- Obtain the connection parameters from the provider: host, port, user, password. If necessary, the IP rotation URL and the login template for a "sticky" session.
- Check if whitelisted IPs are required. If the provider requires binding your outgoing IP, add it in advance in the provider's personal account.
- Perform a curl test. Command: curl -x http://user:password@host:port https://api.ipify.org. You should get your external IP through the proxy.
- Store credentials in environment variables: for example, PROXY_HOST, PROXY_PORT, PROXY_USER, PROXY_PASS. This is safer than storing them directly in the code.
Warning: Never share proxy data over open channels. When passing to colleagues, use encrypted communication methods and rotate passwords as per policy.
Tip: If your provider supports generating a separate login with restrictions (like lifetime, geography), create separate credentials for development, testing, and production. This will prevent unintentional plan overload.
Expected Outcome
You have the host, port, username, and password for the mobile proxy, optionally — the rotation URL and instructions for a "sticky" session. A curl test confirms that the traffic is indeed going through the proxy.
Possible Issues and Solutions
- Error 407 Proxy Authentication Required → Incorrect username/password. Check the credentials. Ensure that special characters are properly encoded if using them in the URL.
- Timeout → The port is blocked by a firewall. Allow outgoing connections to the provider's port or check for an alternative port.
- External IP does not change → Traffic is bypassing the proxy. Check the syntax of the -x key and the presence of authorization.
Check: The curl command returns an external IP different from your regular one, matching what the proxy provider's personal account shows.
Step 2: Install MCP Client and Prepare the Environment
Goal of This Step
Set up the infrastructure: install or verify the MCP client (e.g., Claude Desktop), create an MCP server project, and configure dependencies to work through the proxy.
Step-by-Step Instructions
- Check for Node.js: in the terminal, run node -v. If the version is below 20, install the latest LTS.
- Create a project folder: mkdir mcp-mobileproxy && cd mcp-mobileproxy.
- Initialize the project: npm init -y. This will create package.json.
- Install MCP dependencies: npm install @modelcontextprotocol/sdk axios https-proxy-agent.
- Create the index.js file where we'll place the example MCP server code.
- Open the MCP client. For Claude Desktop, find the configuration settings file. On Windows, it's usually stored in the user's profile in the application data directory; on macOS, it’s in the Library/Application Support directory. Make a backup of the settings file before making changes.
- If using Cline (VS Code), open the extension settings and find the section for adding custom MCP servers (typically the "mcp servers" configuration point). Prepare to add the server script from your project.
Tip: Keep the path to your MCP server project free of spaces and unused special characters. This will simplify configuration and reduce the risk of errors with quotes.
Expected Outcome
A complete folder for the MCP server project with installed dependencies. You know where and how to add a new server in your MCP client and where the client's configuration file is located.
Possible Issues and Solutions
- npm not found → Node.js was installed without npm or not added to PATH. Reinstall Node.js with npm enabled and restart the terminal.
- No access to the directory → Run the terminal as a user with write rights or use a folder in your profile.
- Client configuration file not found → Refer to the help for your MCP client or local documentation on the mcp.html page for clarification on the path.
Check: Run npm list in the project folder and ensure that the packages @modelcontextprotocol/sdk, axios, and https-proxy-agent are installed. The MCP client configuration file is found, and a backup of its original state is saved.
Connecting Mobile Proxy to MCP Client
Goal of This Step
Ensure that all network calls made by tools executed on the MCP server go through the mobile proxy. We'll explore two approaches: global environment variables and proxy settings at the code level.
Step-by-Step Instructions (via Client Environment Variables)
- Open the MCP client configuration and find the section for adding custom servers (e.g., mcpServers).
- Add a new server, specifying the Node.js launch command and the path to your index.js. Example structure: server name, command field: node, args: ["path/to/index.js"].
- In the env section, specify the variables: HTTP_PROXY and HTTPS_PROXY with the value http://user:password@host:port. If using an unauthorized proxy by IP, just specify host:port.
- If necessary, add NO_PROXY for internal addresses that should not go through the proxy (e.g., localhost, 127.0.0.1).
- Add variables for rotation if you want to invoke it from the server: for example, MOBILEPROXY_ROTATE_URL and MOBILEPROXY_API_KEY if the provider requires a key.
- Save the configuration and restart the MCP client so it can reread the new entry and launch your server with the desired environment variables.
Step-by-Step Instructions (via Proxy at the Code Level)
- Open index.js and include https-proxy-agent or axios-proxy configuration.
- Create an agent with data from process.env: host, port, user, password.
- Pass the agent into each HTTP request within the tools of the MCP server.
- For flexibility, add an option: if environment variables are not set, use a direct connection; if they are set — use the proxy.
Tip: Start with client-level environment variables: it's quicker and easier for the first launch. Then, as needed, add finer control in the code.
Expected Outcome
The MCP client launches your server with the specified environment variables, and all outgoing HTTP calls from the server's tools occur through the mobile proxy.
Possible Issues and Solutions
- Server won't start → Invalid script path in args or lack of permissions to execute. Check the path; use absolute paths if needed.
- Proxy is ignored → The client did not pass env to the server. Ensure that you're specifying env in the configuration of the specific MCP server and not globally or in another section.
- Proxy authentication fails → Check if the username/password contains @ and : characters without URL encoding. If necessary, specify them in separate variables (PROXY_USER, PROXY_PASS) and assemble the URI in code.
Check: Run a tool that performs an HTTP request and compare the external IP before and after enabling the proxy. It should match your mobile proxy's IP.
Example Based on MCP Server mobileproxy.space
Goal of This Step
Build a minimal MCP server that: 1) can retrieve the external IP through the mobile proxy, 2) can invoke IP rotation, 3) can perform arbitrary HTTP requests through the mobile proxy. We'll use the package @modelcontextprotocol/sdk and axios, and the provider will be the MCP server mobileproxy.space as an example of integration with mobile proxy providers.
MCP Server Code (index.js)
Below is a JavaScript example. It registers three tools: get_external_ip, rotate_ip, and fetch_url. The tools utilize the proxy, with parameters taken from environment variables. For the external IP URL, we'll use the standard endpoint ipify, and the rotation will be done through MOBILEPROXY_ROTATE_URL.
Example Code:
Save as index.js
const { Server } = require('@modelcontextprotocol/sdk'); const axios = require('axios'); const { HttpsProxyAgent } = require('https-proxy-agent'); function buildProxyAgent() { const host = process.env.PROXY_HOST; const port = process.env.PROXY_PORT; const user = process.env.PROXY_USER; const pass = process.env.PROXY_PASS; if (!host || !port) return null; let auth = ''; if (user && pass) {auth = encodeURIComponent(user) + ':' + encodeURIComponent(pass) + '@'; } const proxyUrl = 'http://' + auth + host + ':' + port; return new HttpsProxyAgent(proxyUrl); } async function axiosViaProxy(url, opts = {}) { const agent = buildProxyAgent(); const cfg = { url, method: opts.method || 'GET', headers: opts.headers || {}, data: opts.data, timeout: 20000 }; if (agent) {cfg.httpsAgent = agent;cfg.httpAgent = agent;cfg.proxy = false; } return axios(cfg); } const server = new Server({ name: 'mcp-mobileproxy-space', version: '1.0.0' }); server.tool('get_external_ip', { description: 'Returns external IP via mobile proxy', inputSchema: { type: 'object', properties: {}, additionalProperties: false } }, async () => { const res = await axiosViaProxy('https://api.ipify.org?format=json'); return { content: [{ type: 'text', text: JSON.stringify(res.data) }] }; }); server.tool('rotate_ip', { description: 'Requests IP rotation from the mobile proxy provider', inputSchema: { type: 'object', properties: {}, additionalProperties: false } }, async () => { const rotateUrl = process.env.MOBILEPROXY_ROTATE_URL; if (!rotateUrl) {return { content: [{ type: 'text', text: 'MOBILEPROXY_ROTATE_URL not set' }] }; } const res = await axiosViaProxy(rotateUrl); return { content: [{ type: 'text', text: 'Rotation requested: ' + res.status }] }; }); server.tool('fetch_url', { description: 'HTTP request via mobile proxy', inputSchema: { type: 'object', properties: { url: { type: 'string' }, method: { type: 'string', enum: ['GET','POST','PUT','DELETE'], default: 'GET' }, headers: { type: 'object', additionalProperties: { type: 'string' } }, body: { type: 'string' } }, required: ['url'], additionalProperties: false } }, async (input) => { const cfg = { method: input.method || 'GET', headers: input.headers || {}, data: input.body }; const res = await axiosViaProxy(input.url, cfg); const out = { status: res.status, headers: res.headers, snippet: typeof res.data === 'string' ? res.data.slice(0, 500) : JSON.stringify(res.data).slice(0, 500) }; return { content: [{ type: 'text', text: JSON.stringify(out) }] }; }); server.start();
Configuring Environment Variables
- In the MCP client configuration, next to your server entry, add env: PROXY_HOST, PROXY_PORT, PROXY_USER, PROXY_PASS.
- Add the MOBILEPROXY_ROTATE_URL provided by the mobile provider. For example, this might be a secure URL that initiates IP change when a GET request is made.
- Restart the MCP client to apply the variables.
Tip: If your provider mobileproxy.space supports "sticky" sessions through user name or request parameter modifications, create separate variables like PROXY_SESSION or PROXY_ZONE, and dynamically adjust PROXY_USER based on these.
Testing Tool Functionality
- Within the MCP client interface, locate the server's tools list for mcp-mobileproxy-space: get_external_ip, rotate_ip, fetch_url.
- Invoke get_external_ip and confirm that JSON with your external IP via the proxy is returned.
- Invoke rotate_ip and await confirmation of status 200 or another success code, as provided by the provider.
- Invoke fetch_url with the parameter url: https://example.org and check that the response has an HTML snippet and a 200 code.
Check: After invoking get_external_ip, the external IP you see in the response matches the one displayed in your personal account on mobileproxy.space. After invoking rotate_ip, the IP changes to a new one (according to your plan and provider's rules).
Possible Issues and Solutions
- Tools not displayed → The server did not start. Check the client logs and path to index.js. Run the server separately: node index.js to see any potential errors.
- rotate_ip returns an error → Check the value of MOBILEPROXY_ROTATE_URL and access from your network. Ensure the URL is correct and no separate authentication is required.
- fetch_url returns unexpected headers → Some websites depend on User-Agent and Accept-Language. Pass these headers to mimic a typical browser.
Tip: For request stability, include headers for User-Agent, Accept, and Accept-Language. This is particularly helpful when parsing HTML and interacting with APIs expecting a specific client signature.
Step 4: Fine-tuning for Client and Server
Goal of This Step
Debug and stabilize the configuration: logging, timeouts, "sticky" sessions, server restarts on failures, rate limiting, and proper rotation strategy.
Detailed Step-by-Step Instructions
- Add enhanced logging. In index.js, wrap axiosViaProxy calls in try/catch, logging response codes, delays, and errors with timestamps.
- Configure timeouts. For unstable resources, lower timeouts and enable retry with exponential backoff if appropriate.
- Enable "sticky" sessions for tasks that require sequence: store session_id in env or server state and dynamically form PROXY_USER.
- Limit the frequency of fetch_url calls: add a request counter and waiting interval between requests to a single domain. This will reduce the risk of temporary blocks on target resources.
- Set up server restarts. If it crashes due to network errors, use a process manager (like node with the flag — or other applicable tools in your environment) to automatically restart the server.
- Reflect your IP rotation policy in code: for example, after N successful requests or on a timer every M minutes, if allowed under the provider's terms.
Tip: Add a server_status tool command that returns your current state: active session_id, request counter, time until the next rotation. This will ease maintenance and monitoring.
Expected Outcome
Your MCP server is resilient to random failures, correctly uses "sticky" sessions and rotation, logs important events, and request frequency can be controlled without modifying client code.
Possible Issues and Solutions
- Excessive logs → Introduce logging levels (info, warn, error) and toggle them via the environment variable LOG_LEVEL.
- Slow processing → Check if you've set overly aggressive delays or if IP rotation is triggered too frequently.
- Random connection drops → Enable keep-alive on agents and decrease the number of simultaneous connections to a single host.
Check: Logs indicate that requests are completed reliably, and upon rotation, the new IP is promptly confirmed by invoking get_external_ip. Errors are handled without server crashes.
Step 5: Diagnosis and Logging
Goal of This Step
Learn to quickly identify and resolve network issues: proxy authentication, timeouts, incorrect headers, routing errors, and environment variable conflicts.
Step-by-Step Instructions
- Check environment variables before launch: output process.env.PROXY_HOST and other key variables to logs when the server starts (without passwords).
- Make a separate test request from the code (for example, to ipify) and output the full response object: code, headers, first bytes of the body.
- Capture minimal metrics: DNS time, TLS setup time, overall response time. This helps identify where the "bottleneck" is.
- Check the headers you are sending: User-Agent, Accept, Content-Type. Ensure they meet the expectations of the target API or website.
- Conduct a curl test for comparison. If curl through the same proxy works consistently, while the server does not, look for an issue in the code (agent, timeout, proxy=false for axios).
Tip: Keep masked authentication logs: replace part of the username and password with asterisks when outputting to logs. This speeds up incident analysis without risking secret leaks.
Expected Outcome
You can quickly localize the issue: distinguish network timeouts from authentication errors or incorrect headers, see where and why requests are slowing down or being declined.
Possible Issues and Solutions
- HTTP 403 or 429 → Too many frequent requests or suspicious client signature. Reduce frequency, adjust headers, use "sticky" sessions for tasks.
- Intermittent connection error → Increase timeouts and enable request retries with gradual backoff delay. Check the stability of the mobile channel with the provider.
- Data mismatch → Compare responses through and without the proxy on a test stand. Check encoding and pass the necessary Accept-Charset headers.
Check: Based on your tests, you have a problem map: you know how long each stage of the request takes and can optimize the configuration purposefully.
Results Verification
Checklist
- MCP server tools are displayed in the client.
- Invoke get_external_ip returns the mobile proxy's IP.
- IP rotation is executed and confirmed by the IP change.
- Arbitrary fetch_url request is successfully made to multiple domains.
- Logs are clear: response codes and timing, and minimal diagnostic messages are visible.
How to Test
- Perform three consecutive get_external_ip requests and record the IP. Then, invoke rotate_ip and repeat get_external_ip. Ensure the IP changes according to your plan's rules.
- Execute fetch_url requests to two different domains. Compare codes and headers. Ensure there are no systematic errors.
- Utilize a "sticky" session (if provided) and check that the IP remains unchanged for the session duration.
Success Metrics
- A stable percentage of successful requests (200 OK) to your target resources.
- Predictable rotation and no unexpected "jumps" of IP during the "sticky" session.
- Low timeout incidence with correct timeouts and retries.
Tip: Implement an automatic "checkpoint" test in your CI: run get_external_ip and a single fetch_url before deployment. This allows you to preemptively catch issues with the provider or configuration.
Common Errors
Problem → Cause → Solution
- Proxy does not apply → Environment variables are not passed to the server process → Specify env at the level of the MCP server entry in the client configuration and restart the client.
- Proxy authentication fails → Special characters in username/password break the URI → Set username/password in separate variables and construct the proxyUrl with encodeURIComponent.
- HTTP 429 Too Many Requests → Too frequent rotation or high RPS → Limit request frequency, use a queue, apply "sticky" sessions for sequential operations.
- Random 5xx on target service → Aggressive retries "break" the unstable resource → Introduce jitter in backoff and reduce the number of retries.
- No tools on the dashboard → The MCP server crashed at startup → Launch the server in the terminal, read the stack trace, fix syntax errors, then reconnect.
- IP does not change after rotation → Rotation did not complete or the route is cached → Wait the interval specified by the provider or request confirmation of the rotation status via their API.
- Conflicts with local services → The proxy is applied to everything, including localhost → Use NO_PROXY=localhost,127.0.0.1 to ensure local calls go directly.
Check: Repeat the problematic scenario after making corrections. Ensure that the symptom has disappeared: proxy applies, authentication passes, response codes are expected.
Additional Capabilities
Advanced Settings
- Secrets and keys: move all passwords and keys into environment variables or secret managers. Do not hard-code them.
- Geotargeting: if mobileproxy.space provides a choice of country/region, create a set_region tool and switch geography without restarting the server.
- Proxy Pairs: for high loads, use a pool of multiple mobile points and a distribution rule (round-robin, by domain, by task).
- Rate Control: add a global rate limiter to the server to not rely on the agents’ discipline.
Optimization
- Caching: for immutable resources, cache responses for a short time. This will reduce traffic and speed up responses.
- Parallelism: limit simultaneous requests to one host, but allow parallelism across hosts to avoid creating a "bottleneck".
- Profiling: collect metrics by domains and types of requests. This will help you understand where optimization will have the most impact.
What Else Can Be Done
- Add a tool to check the availability of target resources (healthcheck_url) with reporting.
- Integrate log export to a centralized storage, like your infrastructure's event log.
- Prepare team instructions and publish them on an internal page mcp.html along with configuration templates.
- Explore detailed material on selecting and configuring proxies for agents on the internal page proxy material for AI agents.
Tip: Formalize "connection profiles" — dev, stage, prod — with different limits and levels of logging. This will simplify maintenance and auditing.
FAQ
1. How long does a mobile proxy's "sticky" session last?
This depends on the provider's plan. Usually, providers offer ranges of 10–30 minutes. Check in your personal account on mobileproxy.space and set the interval in your MCP server.
2. How can I tell if a request is actually going through the mobile proxy?
Compare the external IP before and after enabling the proxy via get_external_ip. Additionally, maintain logs on the server side and, if available, cross-check with the data in the provider's personal account.
3. Can different proxies be assigned to different tools?
Yes. At the code level, create multiple proxy agents and choose them based on the tool name or domain. At the client level — launch several servers with different envs.
4. What should I do if the target site requires special headers?
Pass the required headers through the headers parameter of the fetch_url tool. User-Agent, Accept, Accept-Language, and Referer often help.
5. How can I avoid secret leaks in logs?
Mask sensitive strings and avoid logging complete URLs with passwords. Keep secrets only in environment variables and use password rotation.
6. Can the proxy be used only for certain domains?
Yes. At the code level, conditionally apply the proxy agent only to necessary domains. Send other requests directly. Alternatively, create two tools: fetch_proxy and fetch_direct.
7. What should I do if the rotation does not change the IP?
Wait the time specified by the provider and check the rotation status. Ensure you are not on a "sticky" session if expecting an immediate IP change.
8. How to scale for high load?
Use a pool of mobile points, limit parallelism by domain, add a request queue and smart backoff. For agent work — distribute tasks by profiles.
9. Where to keep team documentation?
The internal page mcp.html is suitable for posting instructions, configuration templates, and rotation policies. Update it as needed.
10. Can I connect mobileproxy.space as a ready MCP server?
Yes, if you have a corresponding server or adapter that provides tools for rotation and requests through their infrastructure. The example above shows how to build such a server yourself based on the SDK.
Tip: Keep an internal "passport" for the server: name, version, list of tools, contact person. This speeds up support and eases onboarding for new colleagues.
Conclusion
You’ve systematically gone through all the steps: understanding what MCP is and why mobile proxies are vital for reliable AI tool operations; preparing the environment; connecting the mobile proxy to the MCP client; implementing a working example of an MCP server with tools get_external_ip, rotate_ip, and fetch_url based on mobileproxy.space; configuring tuning, logging, and diagnostics; conducting tests; analyzing common pitfalls and advanced features. You now have a reproducible architecture: the MCP client controls the tools, the MCP server executes network actions, and the mobile proxy ensures a predictable and customizable network route.
Next, you can: 1) Split the server into modules for different tasks; 2) Add profiles for dev/stage/prod environments; 3) Enable a pool of proxies and dynamic route selection; 4) Document nuances on the internal page mcp.html and link to extended proxy material for AI agents.
Advance towards automation: integrate metrics, alerts for degradation, auto-tests, and managed IP rotation based on schedule or load. The more formalized your network is, the easier it will be to scale agents and maintain service quality.
Tip: Regularly review the limits and rates of the mobileproxy.space provider to avoid hitting quotas during peak hours. Plan capacity and keep backup configuration in case one point becomes unavailable.